The Empire University - Weapons Library

News / 06 September 2021

Hello everybody and welcome to the Weapons Library of The Dinusty Empire!

I am very happy to have finally found a place and people to work with for this amazing project. It has been a long time that I wanted to save and share all the weapons photos I had on my hard drive. Since some "library" closed couple years ago, I was waiting for someone to bring a similar project to life, but unfortunately, no one did. 

The story

Some weeks ago, the idea came back again, and I started to talk about this with Jeremy Estrellado (Lead Environment Artist at Ubisoft Massive, Dinusty Empire Founder). He directly purposed to use the Notion platform because they already have all the University project and Empire Command page on it. 

Then we started to work, Jeremy on the technical Notion side ( + feedbacks / ideas of course) and me on the guns side (all the photos uploads, infos etc...), and after a good week of work we already had our V1 available. Go check it out !

What is the purpose of this ?

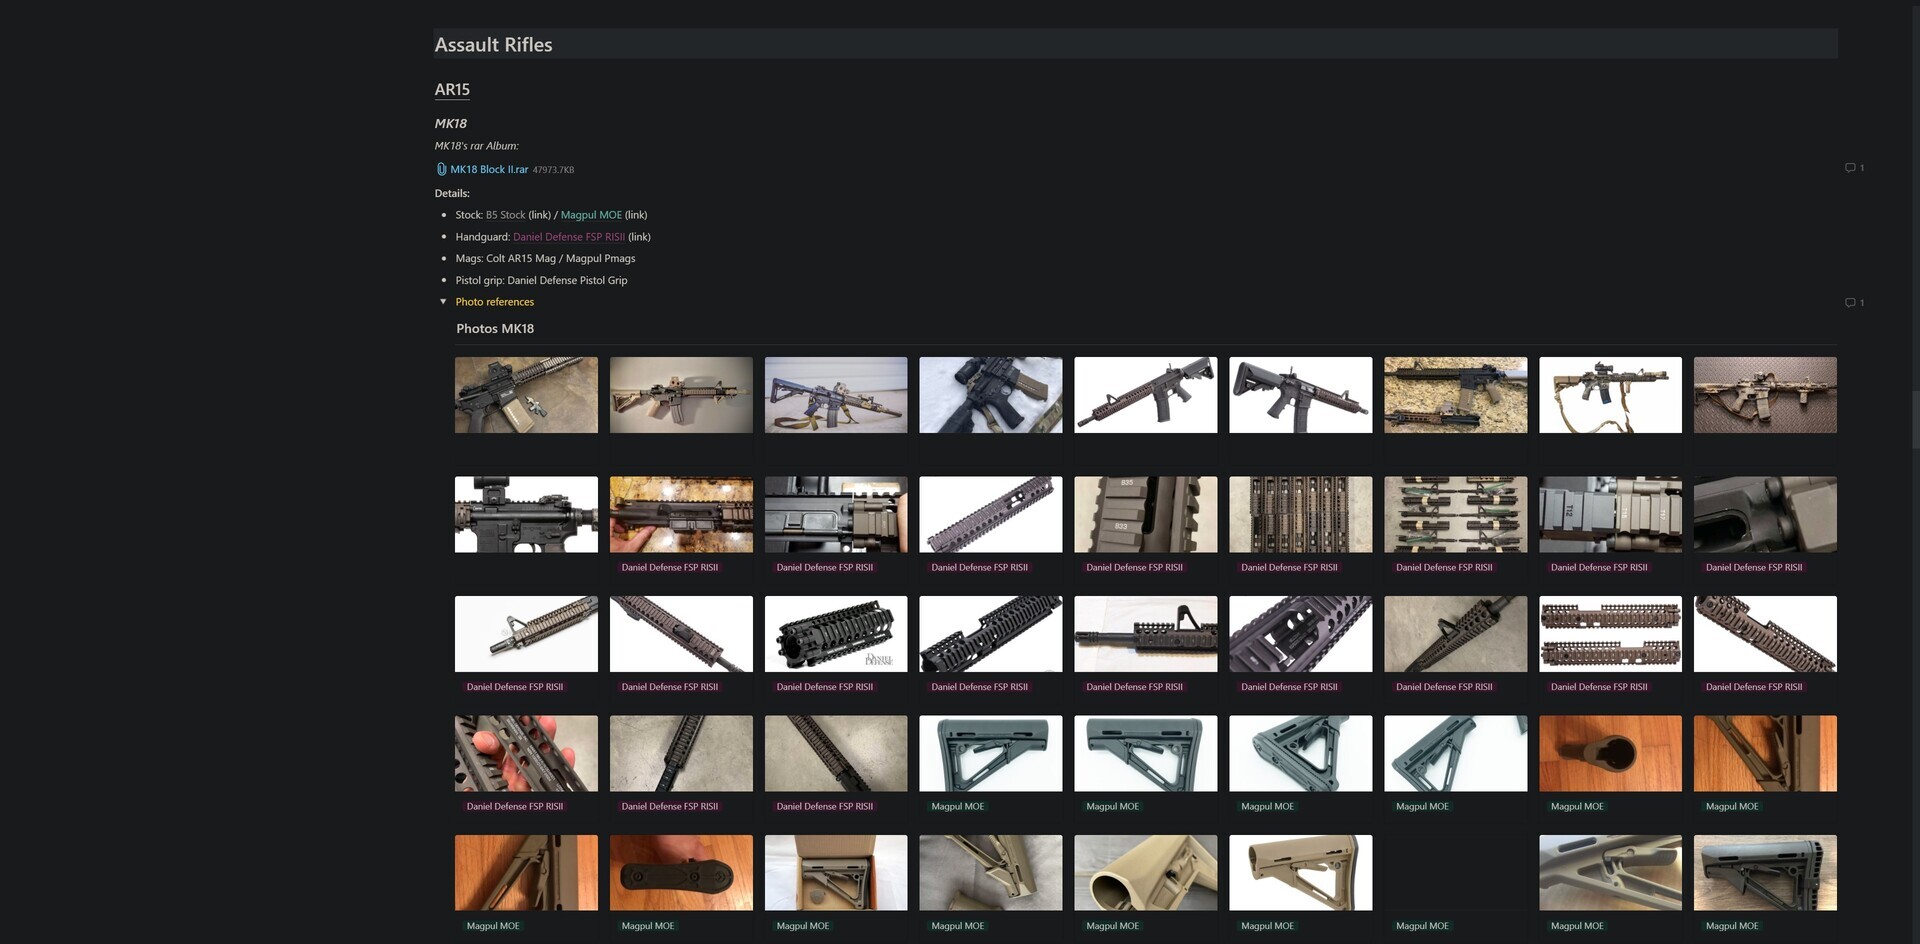
The idea of the project is to provide a good photo & info base to any people who want to model a weapon. Right now, we have 67 guns; each of them have at least 20 highres photos, but the ideal goal is to have between 50 / 100 photos (most of them are around this goal). You can pick just two or three photos or directly download the entire album as a rar file. 

(how each gun is arranged)

All the current weapons - last updated 02/10/2021


What's next for this project ? 

First, you can follow our progress HERE. I want to be clear, the plan is not to add EVERY weapons, this is almost impossible. What we want, is to have all the most "know" weapons before adding some rare, lost ones. It's the same with the weapons who have a big number of variants, some AKs models for example have a huge number of variants based on where and when they were made, we will not cover all of them.

 You can see the current list of what we will add in a near future bellow, this list will grow with time of course. We have plans to add an "old era" category with first, World War I & II weapons. 


This list was updated the 10/10/2021 - 98 weapons in total

Last words

This is a big project for every person out there who want to create weapons, this project is there to save them time! I'm very excited to add all the stuff we have planned, and I can't wait to see all this stuff uploaded and your reactions. If you want to contribute to this amazing project, you can contact me on Artstation, twitter, or discord (Defcon#3216). I would like to thank Jeremy for his help on this amazing project and every person who are helping or will ! 


Report

Launching my Youtube Channel

News / 05 July 2024

I just launched my youtube channel! 

It's been on my to-do list since quite some times now, and it's finally up 😄
I can't wait to share some tips/tutorials/breakdown and progress videos with you people.

The first videos are mainly normal speed OR timelapsed ones with chill music, but tutorials about CAD workflow for Games will follow soon!
You can find the first chapter of this Case asset, Plasticity/CAD chapter, available bellow:

Feel free to share and subscribe!

Report

Plasticity X Blender - Voxel Remesh Workflow

General / 29 May 2024

After receiving multiple questions about the voxel remesh workflow, and how I was working with plasticity, I decided to write this article. 

The goal is to create a fast (but good) high poly from a high resolution mesh exported from our CAD software.
The idea of the workflow is the same as described in an older article, but I'll share new, updated export values for Plasticity and Moi3D and show how you can achieve similar results within Blender.

Since quite some times now, I've been using the following paid addon for the voxel remesh: BLACK MESH

Why are you using this addon ? Because, in my opinion (and after doing tests), the voxel remesh with Blender's modifier is pretty heavy in terms of resources, you're getting a lot of long computing time freezes. Except if you have a really, really high end PC. Black Mesh is doing some magic in the background and allowing you to remove, almost completely, these long computing freezes. 


For the vanilla/free version of the voxel remesher in Blender, I recommend you the following video of Tim Bergholz:


Now, let's jump into the process. 

Ia. Plasticity Export

When you're done with your CAD model, you need to export a really high resolution OBJ mesh from Plasticity, these are the settings I'm using to get enough topology in every area, avoiding any shading issues with the voxel remesher:

Thanks to Pascual Hernandez for sharing the settings initially.

You can see that we have a good topology density everywhere on the mesh. Now, for some models, it might be overkill, but for the meshes with some weird curved area, you'll need that density to avoid any shading issues like here:

As you can see, by using different results, we're getting a lot less topology in this curved area, and you can see on the left that we have slight edge shading issues. It might look small on the high poly, but it will be more visible with baking.

Ib. Moi3D Export

Here's the updated moi3D export setting to get a similar density on your meshes:

Thanks to Cohen Brawley for sharing these settings.


II. Blender Voxel Remesher

Now that our mesh is correctly exported, let's import it into Blender and remesh it. 

Here's the Black Mesh's values, which I'm using in general:

Here's a process video to demonstrate the speed of the addon/process:


Here's the result before(left) / after(right):

We can see that the remeshed one could use some decimation master/reduction of topology in the flat areas. You can do that by adding a decimate modifier and trying to get it more optimized, personally, I'm facing some freeze by doing so, maybe the latest Blender's version is more stable, I'm still in 3.6 after all. 

I hope this small guide was useful and clear enough to understand the CAD/Voxel Remesher workflow.

Have fun!

Report

The Guide for Modern Gun Texturing [Repost]

Article / 07 May 2023

This article is from SEP 30, 2021 and was written for Game Art Blog. I'm posting it here because the Game Art Blog was shutdown.A lot of things like Tools, values and more have changed in my workflow since this article, I'm gonna do an updated article in the next months.

Hi! My name is Howel Ganuchaud. I'm a freelance Environments & Weapons artist from France.

Today, I would like to talk about weapons texturing in-depth. Some ideas and principles can be used for any props texturing, but I'm going to focus this article on weapons and how you can push that last 10% and reach that "godly" level.

Some context before starting. I love firearms. I'm not talking about the political side of firearms (good or bad). I'm talking about designs, shapes, materials, internal systems, etc.

Every time I watch a video about the internal system of a firearm, I'm always impressed by how "simple" and "complex" it is simultaneously.

For me, through the texture, you can tell a lot about what happened to the model. How old it is, what part of the world did it see, who's the owner, did he take care of it... those are some questions I'm trying to answer when I'm working on the texture.

Now, let's dive deep into it!

I. Decrypting Your References.

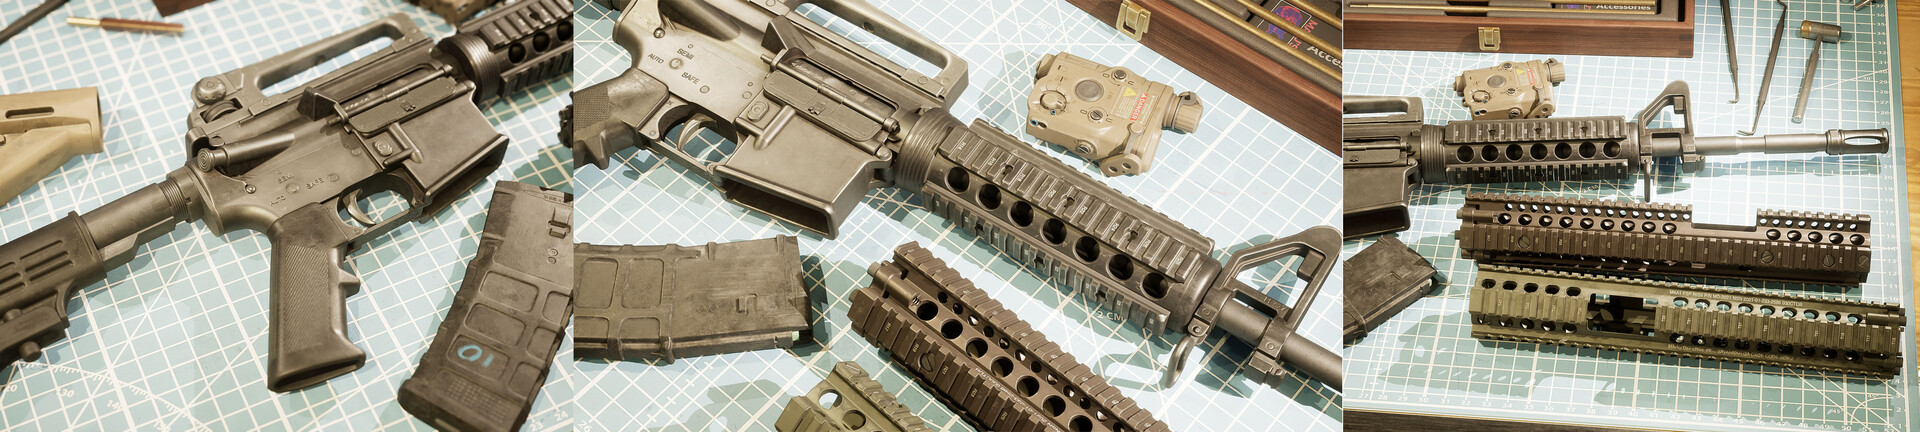
Extracting information from references can be tough at first, but the more you watch photos, the more details you see. Here are some examples of what I "see" when I take a look at weapons photos.

Even a "clean" / "new" weapon will have:

  • Roughness scratches.
  • Roughness variation.
  • Color variation.

Used weapons will have:

  • Edges wear (on located areas).
  • Metal/Polymer Scratches.
  • Height damage.
  • Color variation.
  • Roughness scratches.
  • Roughness variation.

Rust = I want to make a quick point here, rust on a modern firearm is "rare." It's not because you want to make a post-apo gun that you NEED/SHOULD put rust everywhere. We will see a bit more of that in the PBR Knowledge section.

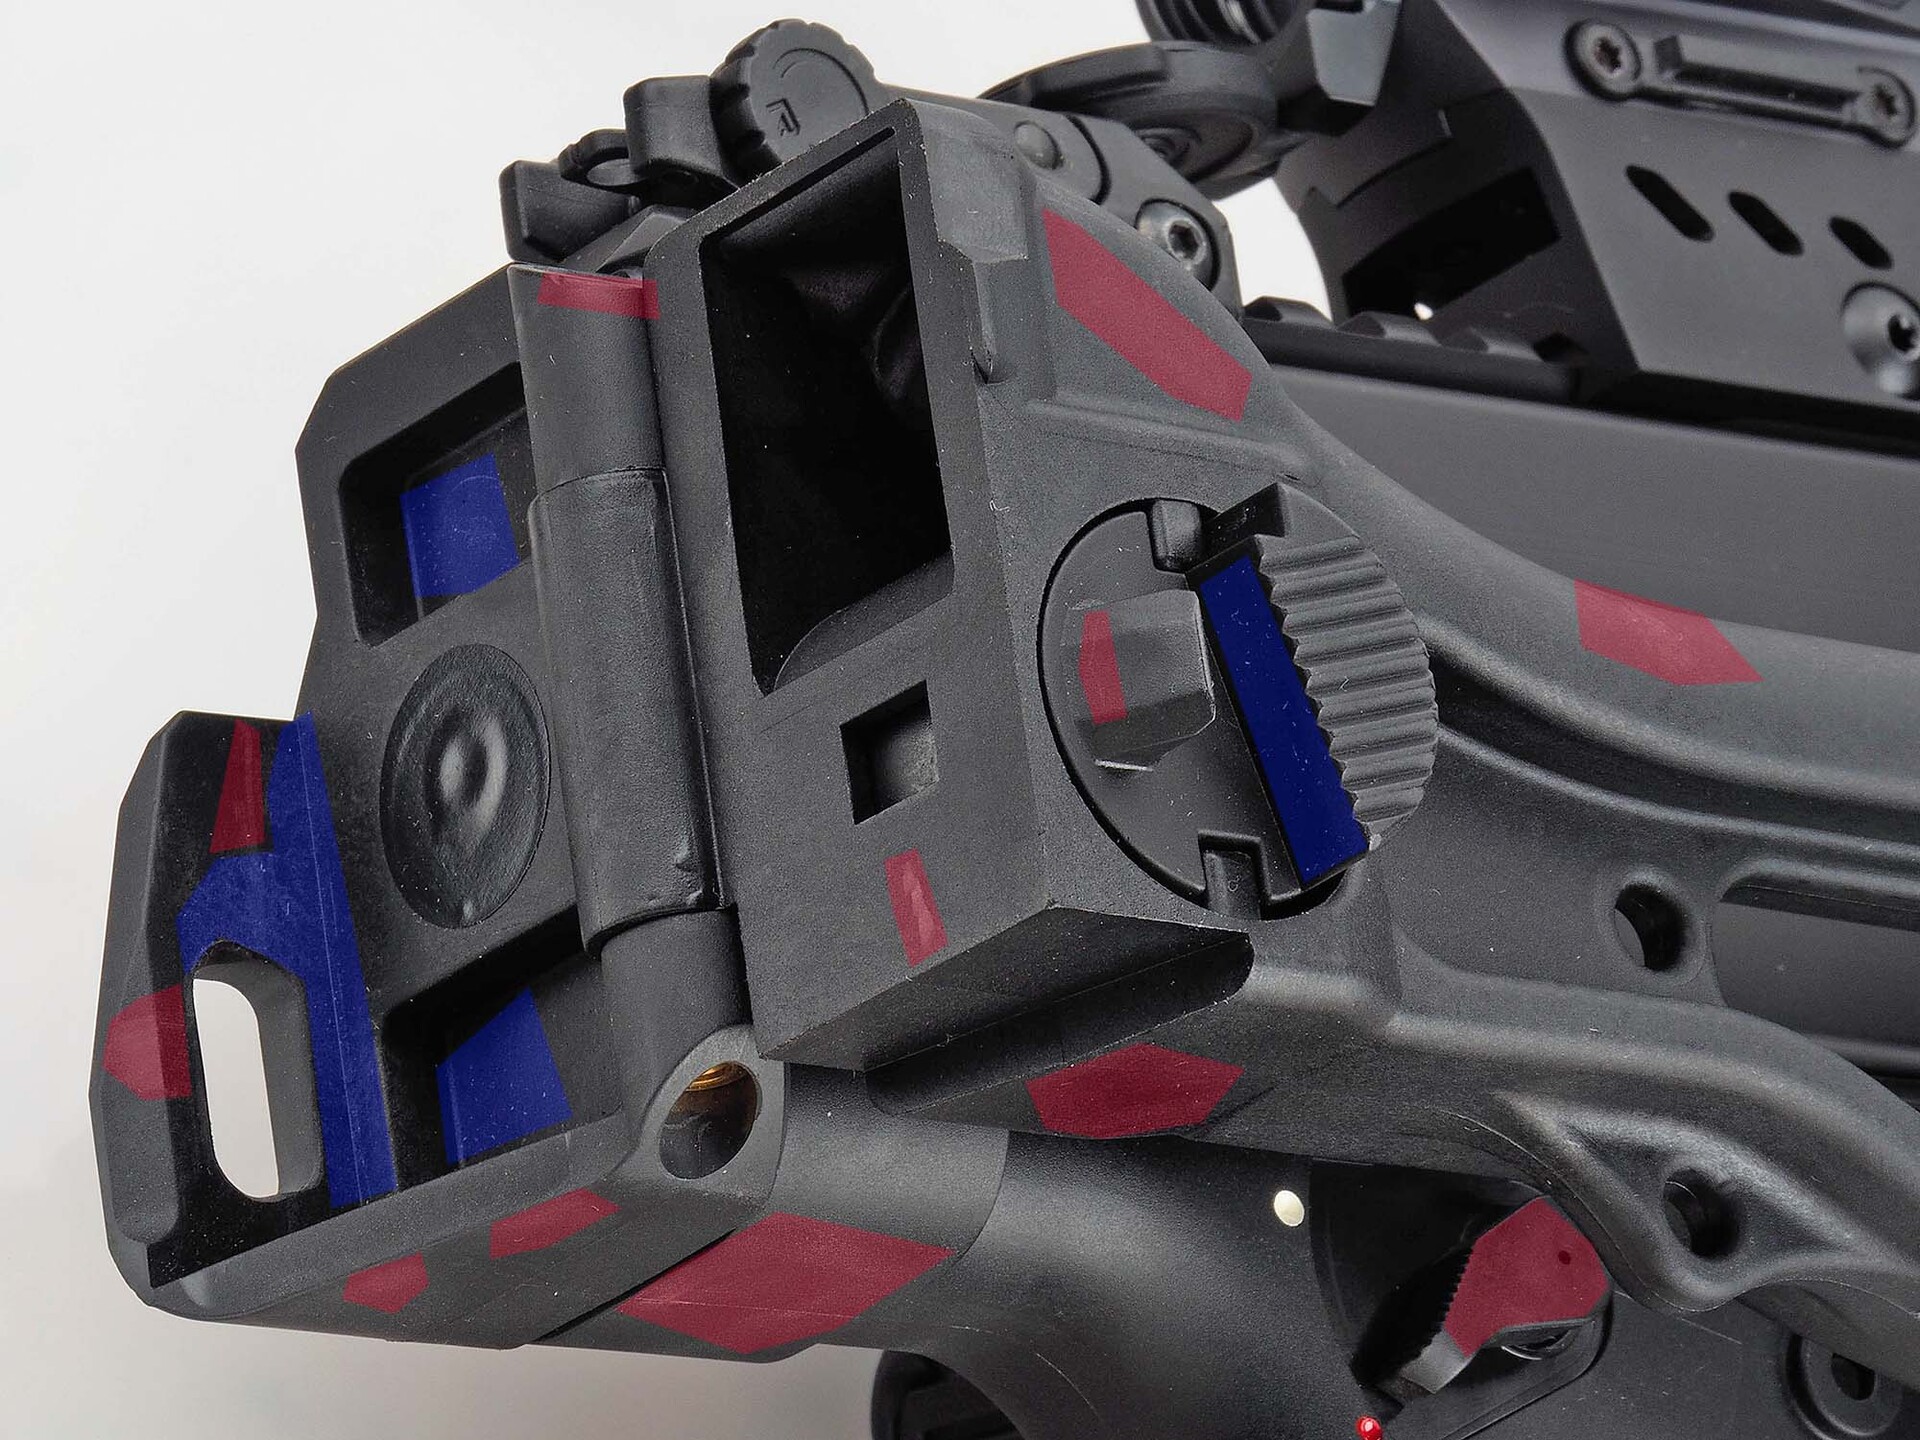
These are two examples of how I decrypt my references:

  • That part of the gun is a polymer.
  • Red: Colour variation, Roughness variation, scratches (color/roughness).
  • Blue: Dust, mainly in AO areas.

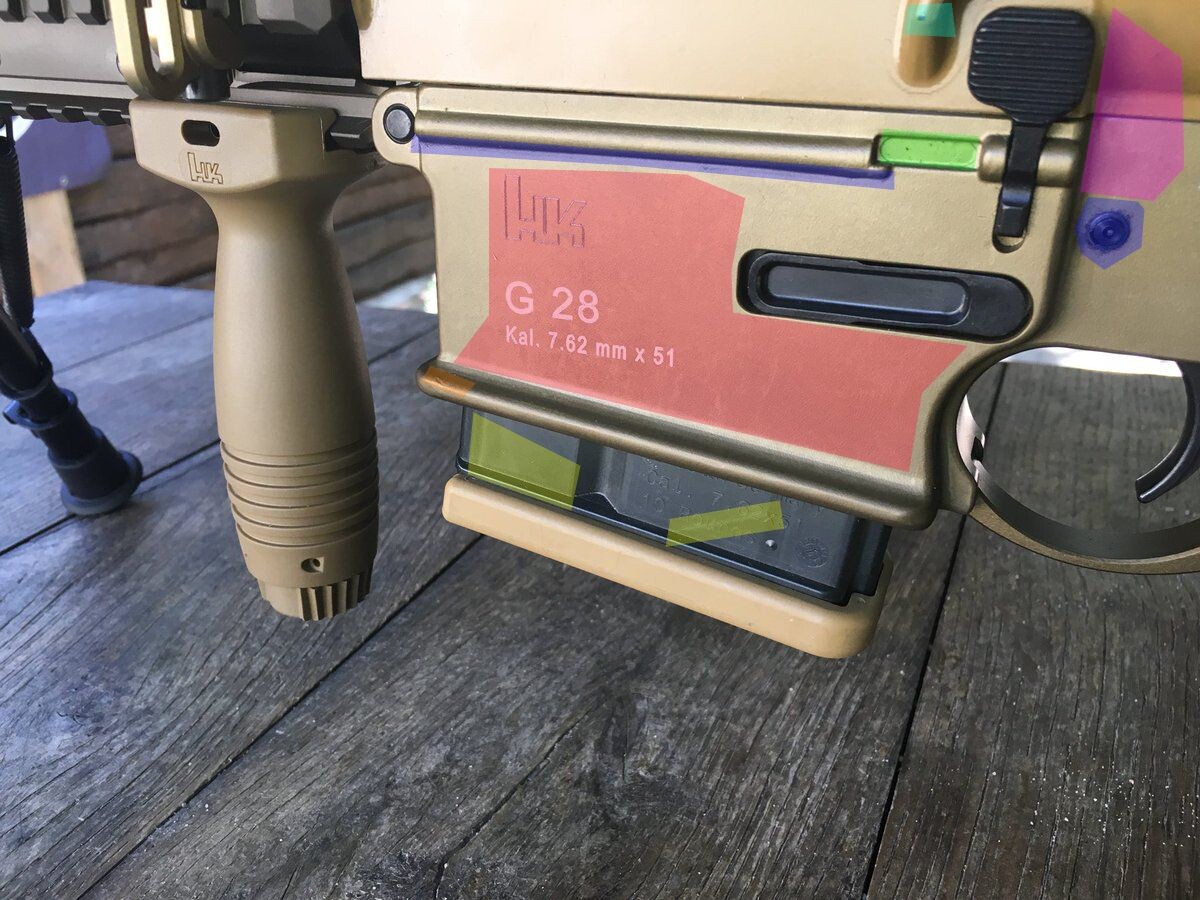
In the example below, the same principles applied.

  • Red: Color/roughness variation.
  • Green: Dirt points.
  • Orange: Height damage.
  • Yellow: Roughness scratches.
  • Blue: AO dirt/dust/grease.
  • Pink: Colour / roughness variation.
  • Cyan: Edge damage.

You can find the albums with more decrypted refs here and the original photos here.

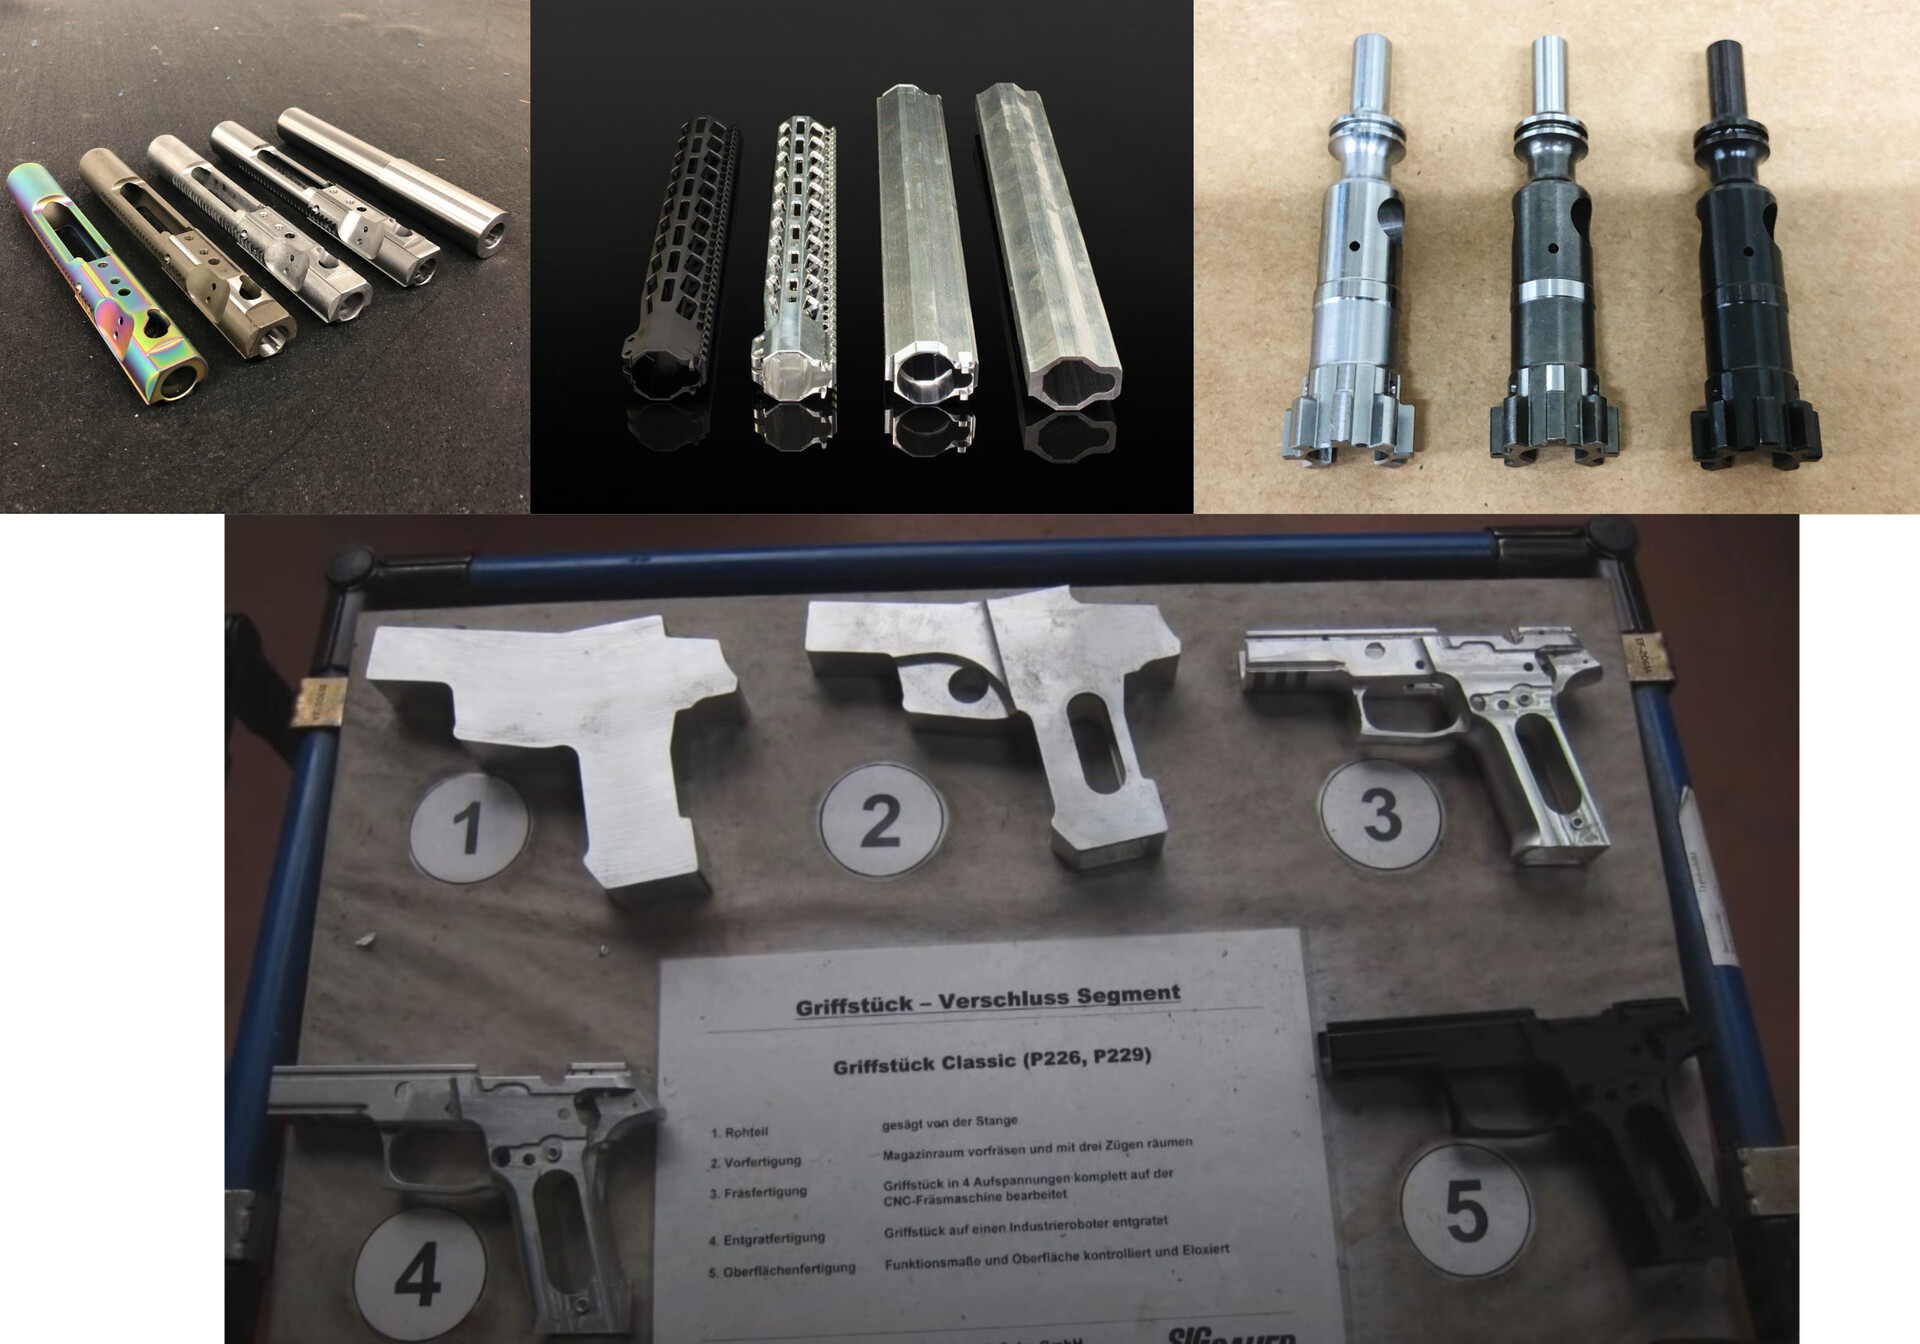
II. Understanding How Guns Are Made.

Now, you need to understand that "modern" firearms (not WWI / WWII or before) will always have the same materials. Some variations through manufacturers, models, types of firearms, will exist but you will generally have the same surfaces.

What does that mean exactly? It means, for example, that if you are working on an AR15 and reach a realistic texturing, when you move to another modern gun, you will still be able to apply your knowledge to this new gun because it uses the "same" materials.

You will have to figure the moving parts, what areas would touch a surface if the gun falls on the ground, the shooter uses a wall to hold the gun, etc ... But you will win a lot of time because you already know how to make this model looking realistic and good. You will have a good base to start with.

We will look at how you can use those extracted pieces of information in Substance Painter later.

It’s been a long time since I wanted to save & share all the photos I grabbed those last few years and create something to help other artists.

I didn’t know exactly how to do that. Then, I talked about it with Jeremy Estrellado (Lead Environment Artist at Ubisoft Massive, Dinusty Empire Founder), and the idea of using Notion for that came out.

After some work, the WEAPONS LIBRARY was born!

This is a notion’s page that references a lot of weapons. We just released the first version, so you don’t have all the weapons (yet 😉), but the idea is to provide a good, high-res photo base for each weapon.

You can pick just the photos you want/need or download the complete album (.rar file). Also, if you want to participate in this project by sending some high-res photos, you can contact me on Artstation, Twitter, or discord (Defcon#3216).

III. PBR Knowledge - How Does a Material Work in Real Life?

"Learn about PBR" - "You need to check more about PBR" - "PBR Knowledge is really important, go check it out" I heard that a lot of times, and every single time I ended up on the Substance Painter documentation page, where they explain how PBR works and every single time I was like "How that stuff is relevant ? I know how PBR tech works".

It took me a long time to understand what people meant here. That's why now I'm saying "Real Life Materials."

This section will talk about how materials work in real life and why you should learn about them.

I know you want to jump into the painter stuff and learn some tricks to achieve that super realistic texturing. Trust me, I know, but I would have loved to understand that stuff earlier. It will help you achieve that texture level.

First, for metal parts, I really recommend you to watch the following video multiple times.

Then for Polymer parts, you have the following article:

https://www.hubs.com/guides/injection-molding/

And the following video:

Unfortunately, I couldn't find any gun parts molding videos. But it's based on the same process.

Long story short, at the beginning of 2021, I was working on my MP5. I posted on The Dinusty Empire Discord to get some feedback.

I got some cool reactions. I was happy. Then, Jeremy Estrellado told me that I was missing that last 10 percent, and he recommended I look at how materials were working in real life. I can't thank him enough because, after that talk, I found the video I shared above, and it was life-changing for me.

Before that video, my texturing workflow was simple. Weapons use metal, black or TAN metal, so I'm using painted metals materials. That was the mistake. Firearms don't use painted metal. It's coated metal.

This is a great page that I recommend to understand the materials as well.

https://www.wingtactical.com/common-gun-coatings/

Some great examples of recapping the different levels of the part of a firearm:

To recap:

  • Guns don't use painted metals (stop using them).
  • Learn about how something is made when you want to reproduce it in 3D.
  • Guns are mainly raw metallic parts until the very end of the production.
  • The coating is multiple layers that cover the entire part to protect the metal from the different elements (this is why a gun will rarely be rusty).
  • You need to understand that the coat is really thin compared to a painted metal where you will have that "height" in the scratches or damages. You will barely have that height effect on a modern firearm.

IV. How to Use the Extracted Information in Substance Painter.

Now that you know how to extract pieces of information from your references and how the materials of firearms work in real life, let's dive deep into Substance Painter and learn how to create those details.

For me, texturing is the most important part of model creation, at least for a realistic model.

Before starting, I recommend you to check those two free Artstation's courses:

These are two major courses, a lot of important stuff there. Go check them out!

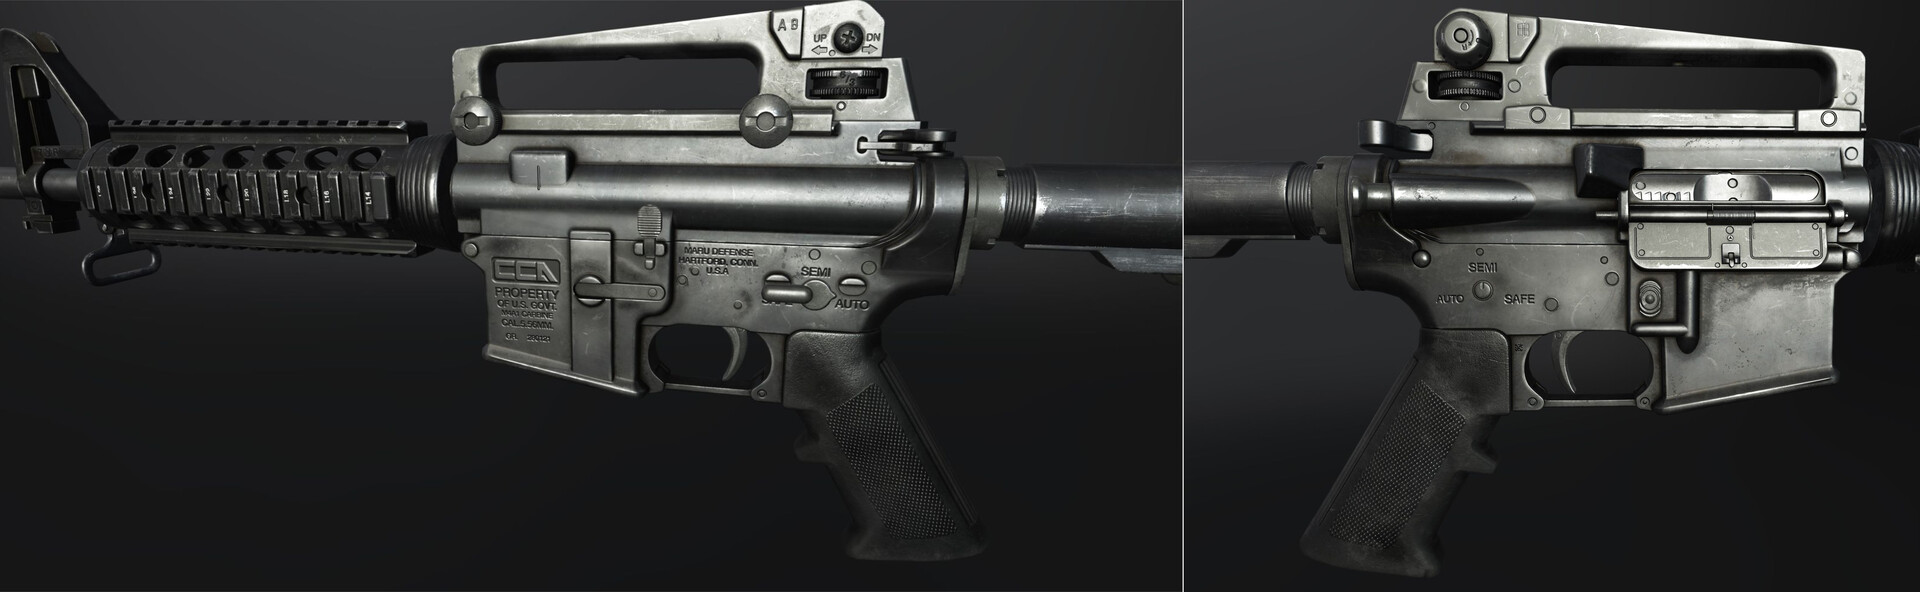
Bellow, you can see my M4 model in substance painter. You can compare some references I shared above with my texture. You will see some similitudes, especially for all the small details.

This model was going to be used in UE4, so I used the ACES LUT made by Brian Leleux; this is why the model looks more contrasted than the default painter's viewport.

The color map screenshots are here mainly to show you all the small details I put in the textures.


There's a lot of color variation here, especially around the moving parts and the hands' placement. All the "real" metallic wears are on specific areas (mainly those touching the different surfaces first). It can be a bit strange in these photos because some areas look really white. It's not directly edge wear, but edge highlights.

The roughness map is the most important texture when you're working in PBR. You need a good variation through your materials to make it real.

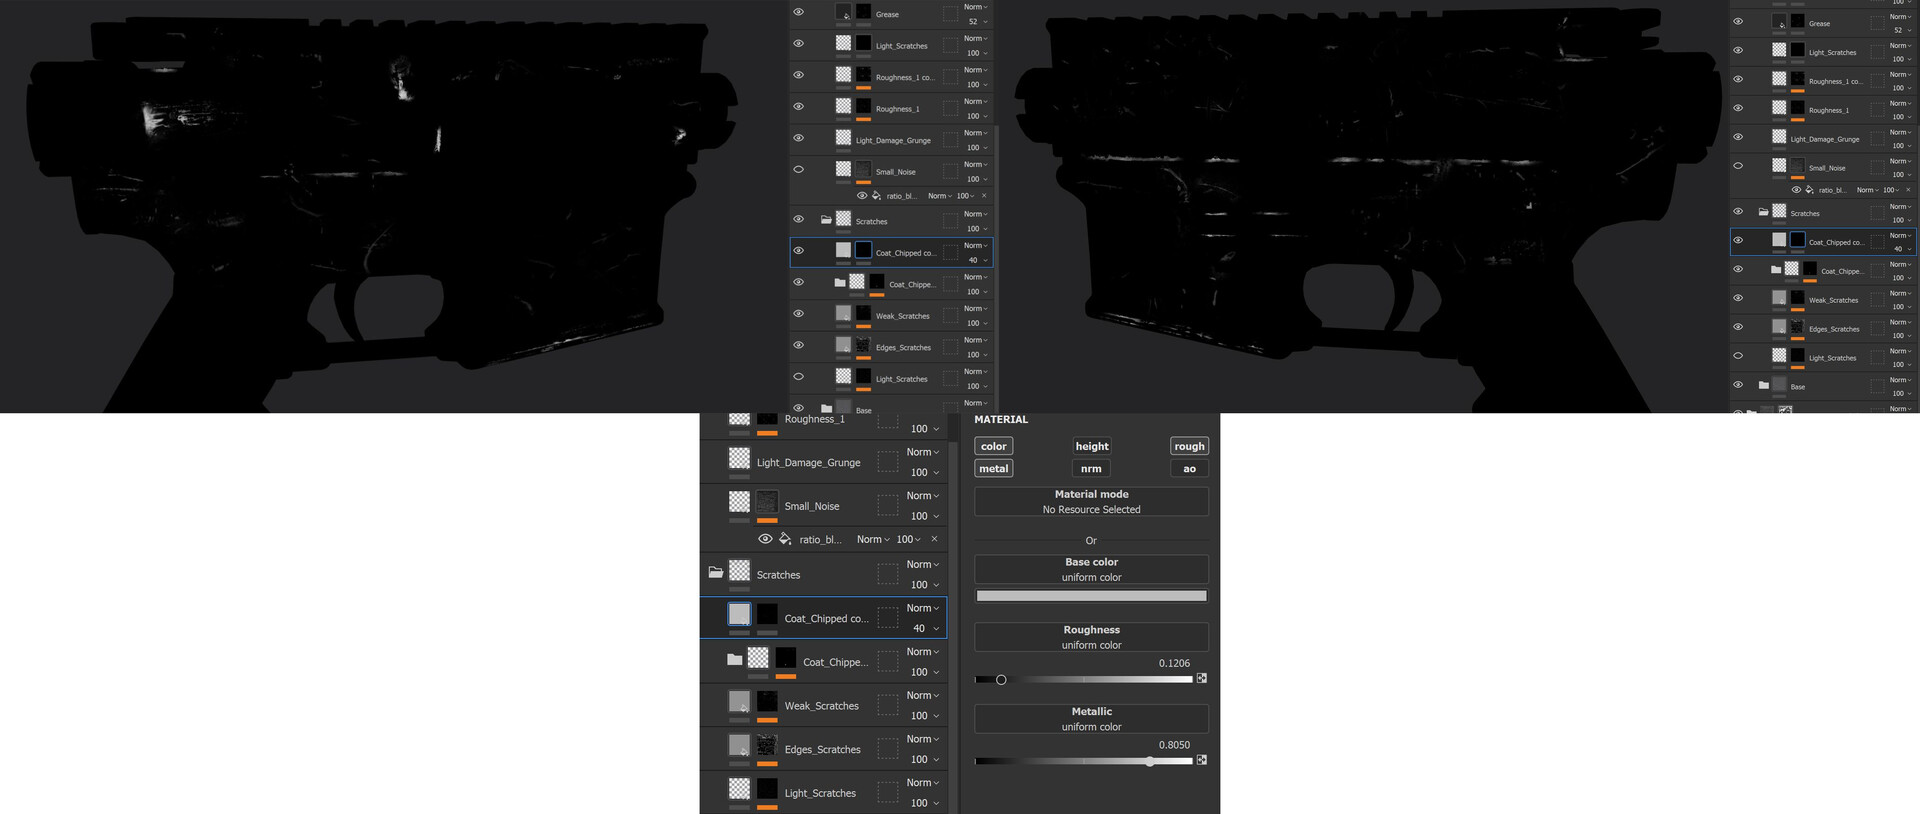
This is where the interesting thing starts. You will see that my small white/gray scratches and details, in general, are inside the colormap and the roughness, not the metallic.

Why did I do that? It's connected to the goal of this project. The client wanted a "clean" but not a "new" weapon, and he didn't want any damaged / post-apo version.

This is where I took the direction of "slight damages." It means that the weapon is used almost every day (probably by cops or the military).

It will take some hits, it will touch other surfaces (fall on the ground, touch a wall, touch some parts of a plate carrier, etc...), but at the same time, it's not old or broken.

That's why most of my medium & small details are "slight" because it's not deep enough to cut through the coating. But it doesn't "kill" the effect. As you can see in the photos below, it works pretty well.


This is how I achieved those details. Nothing fancy here, just a simple layer with an opacity of 40% and some basic values. No generators. I did all those small details by using Stencils.

That's why I recommended those two Artstation courses. Both of them use Stencils intensively, and you should too if it's not already the case.


V. Polymer Materials.

I'm going to make a quick focus on the polymer here to show you how I work with those materials.

My polymer material is pretty simple, and I'm using the same "rules" as the metal material.

With a good breakdown of your references, you can see that a good color variation is really important before going into real height damages for polymer parts.

Try to focus on the color and roughness map first.


Those polymer materials are really tough, even tougher than metal sometimes. You need to understand that you will need a lot of weight & force to really damage those things.

That's why I said you should focus on color & roughness variations. Because if you look at some plastic objects around you, in your everyday life, you will see that plastic materials will have a lot of "used" areas, with discoloration.

Then, if you really want to add height damages, try to create "unique details" instead of using scratches everywhere. Just add some damage in one unique location. It will add some storytelling.


I'm using as a base the "Tactical Plastic" smart material. I don't remember if it's a default smart material of painter or part of that military pack they made some long time ago.

Then I'm adding all this roughness and color variation layers, some dust, and dirt. Don't forget to add a Sharpen filter at the top, with a value between 0.2 & 0.35. It will push your details a bit and kill that blurry effect that you can sometimes have.

That polymer smart material was "updated" a bit later during the texturing of the M4. I'm expecting to update it in the future the more I'm learning plastic materials (always learning).

Another cool tip, when everything is finished, you can add a paint layer that you put in "passthrough" on BaseColor, Roughness, Metallic, Normal, Height & AO(if needed), and then you paint on the UV seams cuts that you have somewhere on your model with the clone tool to hide them. It took me a while to learn this really cool tool.

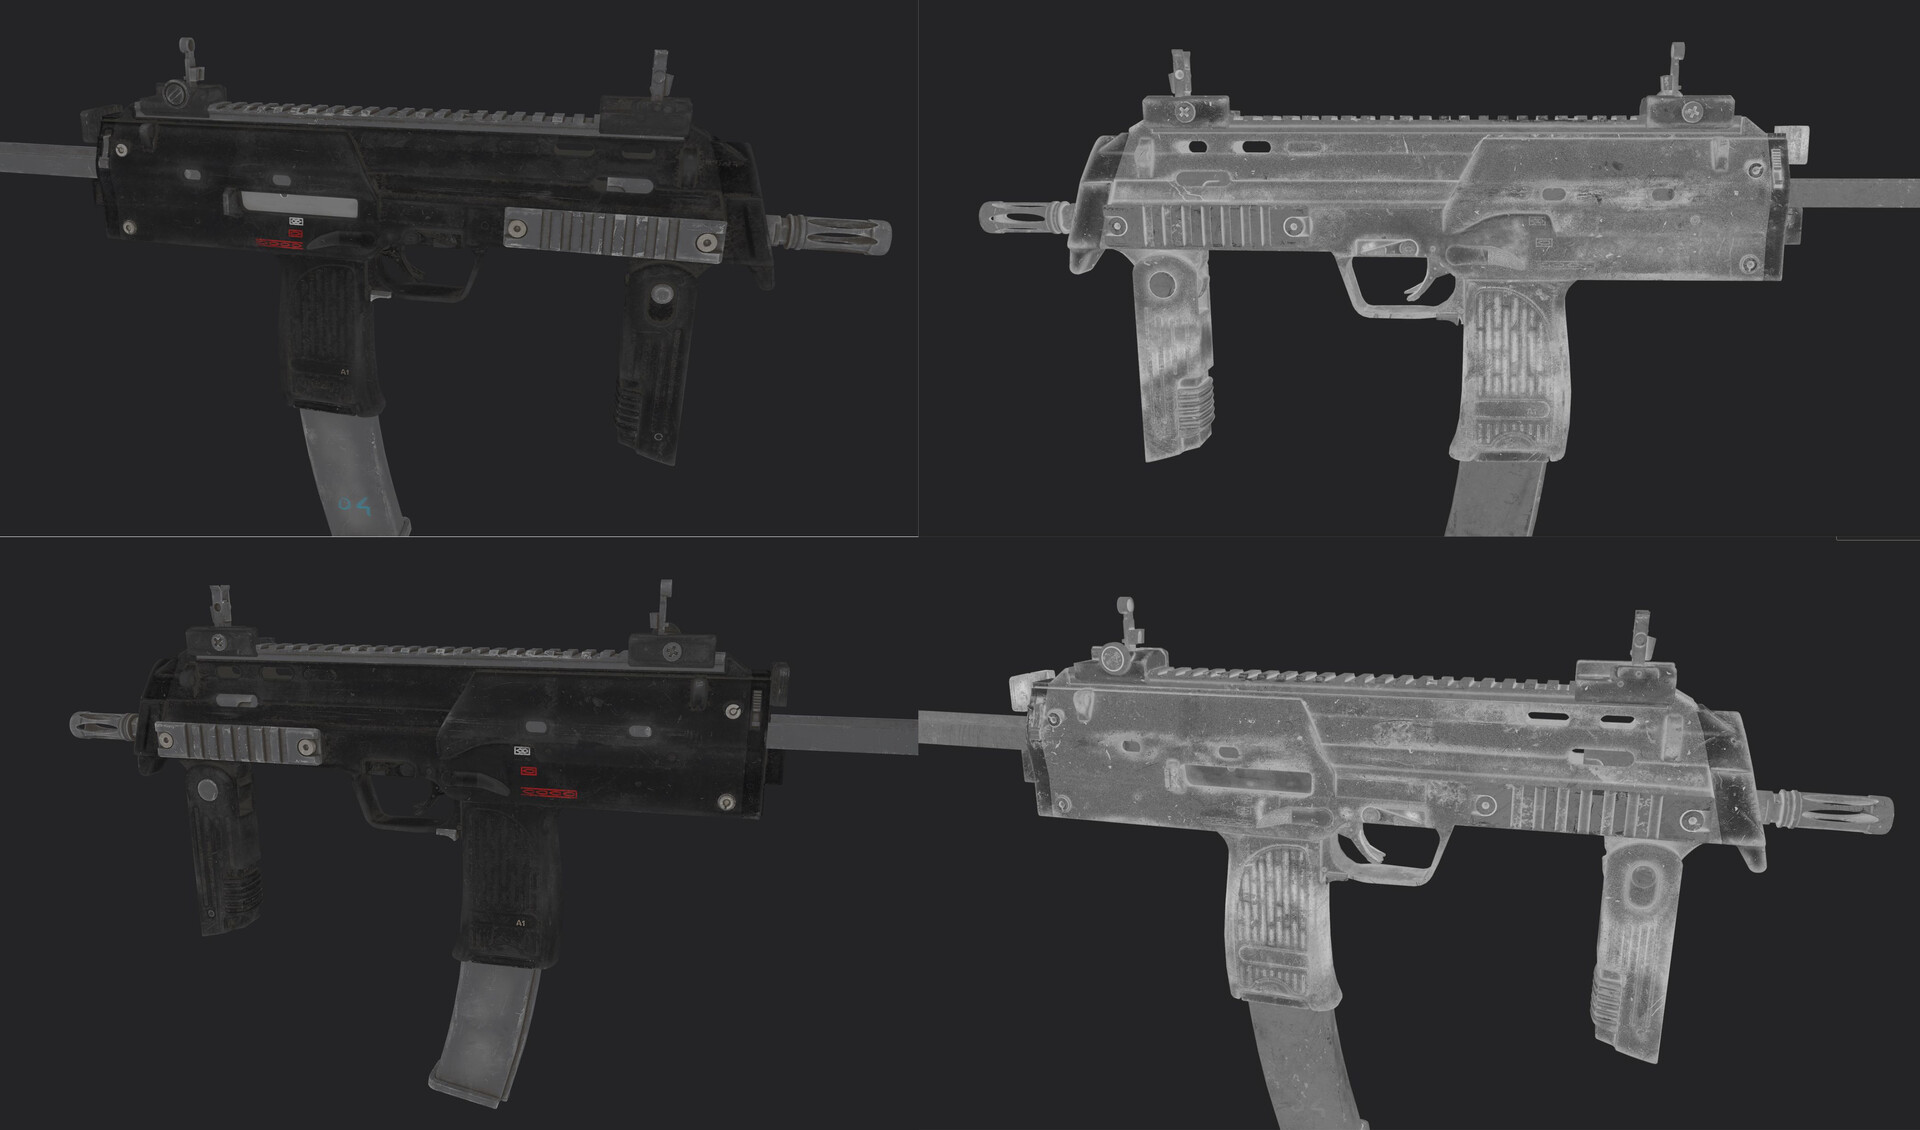
I did some breakdowns of GIFs of the MP7 and the P320 M17 to show you the different layers.

To recap:

The "trick" I got in my backpack for my texturing is just a multitude of small things:

  • A good understanding of how materials work in real life.
  • I know how to extract pieces of information from my references.
  • For every project, I know what kind of storytelling I want to achieve. If it's a brand-new gun without a lot of damages (P320 M17) or if it's a gun that has been used a lot and for a long time (MP5 / MP7).
  • It's important to have some firearms knowledge to integrate "by who" it's used.*
  • I'm using stencils intensively.
  • Use smart materials. After every project, I save my smart materials (metals, polymer) for all my last weapons, and after each project, I improved them. I'm not saying they're perfect, but right now, it gives me a great base.
  • The last important point, I'm looking for feedback all the time.

*Having some firearms knowledge help a lot, especially during the texturing time. By “firearms knowledge,” I mean how a firearm is carried, where the hands are, how it works to understand where the grease will be, those kinds of things. You can even push it further. For example, a special forces operator will not carry/use a weapon the same way a rookie handles it. You can integrate those levels of skills in the texture.

VI. Getting Feedback.

Doing art is not an easy job. You learn a lot from others, all the time.

I recommend you to look for feedback as soon as possible, don't wait to be at the end of your texturing phase. Ask when you're still in the modeling phase to see if you missed something if you are in the right direction.

Critiques or feedback are not only for the final model look or when you posted it on Artstation. It's for every stage of your project.

Go meet other artists on forums and Discords. This is how you will grow as an artist, and you will make some contacts in the industry too.

Some great places on discord:

There's more out there, but those are the biggest I know.

Thank you for reading this and for having reached this part. I know it was a bit long, but I had "a lot" to say.

Thank you, Javier, for the invitation. It was a great opportunity for me to cover all my texturing workflow.

This article is from SEP 30, 2021 and was written for Game Art Blog. I'm posting it here because the Game Art Blog was shutdown.A lot of things like Tools, values and more have changed in my workflow since this article, I'm gonna do an updated article in the next months.

Report

Exploring Fusion 360 & Zbrush for Weapons [Repost]

Article / 07 May 2023

This article is from SEP 30, 2021 and was written for Game Art Blog. I'm posting it here because the Game Art Blog was shutdown.
A lot of things like Tools, values and more have changed in my workflow since this article, I'm gonna do an updated article in the next months.

Hello, I'm Howel Ganuchaud, a French Weapons and Environments artist. I had the pleasure to write a previous article here, where I focused on my texturing workflow and how I approach texturing in general. Find the article below: 

I'm doing weapons for some years now. I always used the subdiv workflow, the "classic" workflow, I would even say. I knew Fusion was something I wanted to look at, but I was good in my comfort zone, and because I never took a real look into Fusion, I always thought it was complicated. How wrong I was, but I was just not ready to jump.

I recently started to learn Fusion 360 for my weapons creation. This powerful software is easy to use/learn/work with, and I wanted to write something about all the stuff I learned to help anybody else who wants to switch to it.

I. Fusion 360 - Base Mesh Creation

First, I'm going to list the videos I watched to learn Fusion:

These Artstation Learning series by Duard Mostert are great as well. I'm also linking a great article that helped for Moi3D. 

During the first hours of using Fusion, I was amazed at how easy it is to work with. Fusion handles so many "small" things for you that would usually annoy you (or at least annoyed me).

From my point of view, CAD software is made for people who are not 3D artists, so everything needs to be simple and accessible. Working at 100% in non-destructive, keeping the edges control, even after multiple Booleans is incredible, and I don't even talk about the time you save when you don't have to take care of the topology at all.

I start with a blockout (as always), and then I do a mesh with almost zero bevels on the edges. I try to keep the model as sharp as possible. The idea is to create the only details that affect the silhouette of the object.

After watching the videos I posted above, you should be able to make any kind of object in Fusion. It will be enough for you to understand the modeling logic of Fusion.

I don't know if I would recommend this software for a "newbie." The subdiv workflow is still used in our industry, but it gives you the "problem solving" skills that will appear when you're stuck in Fusion (but I'm sure this is something you can develop using only Fusion, of course).

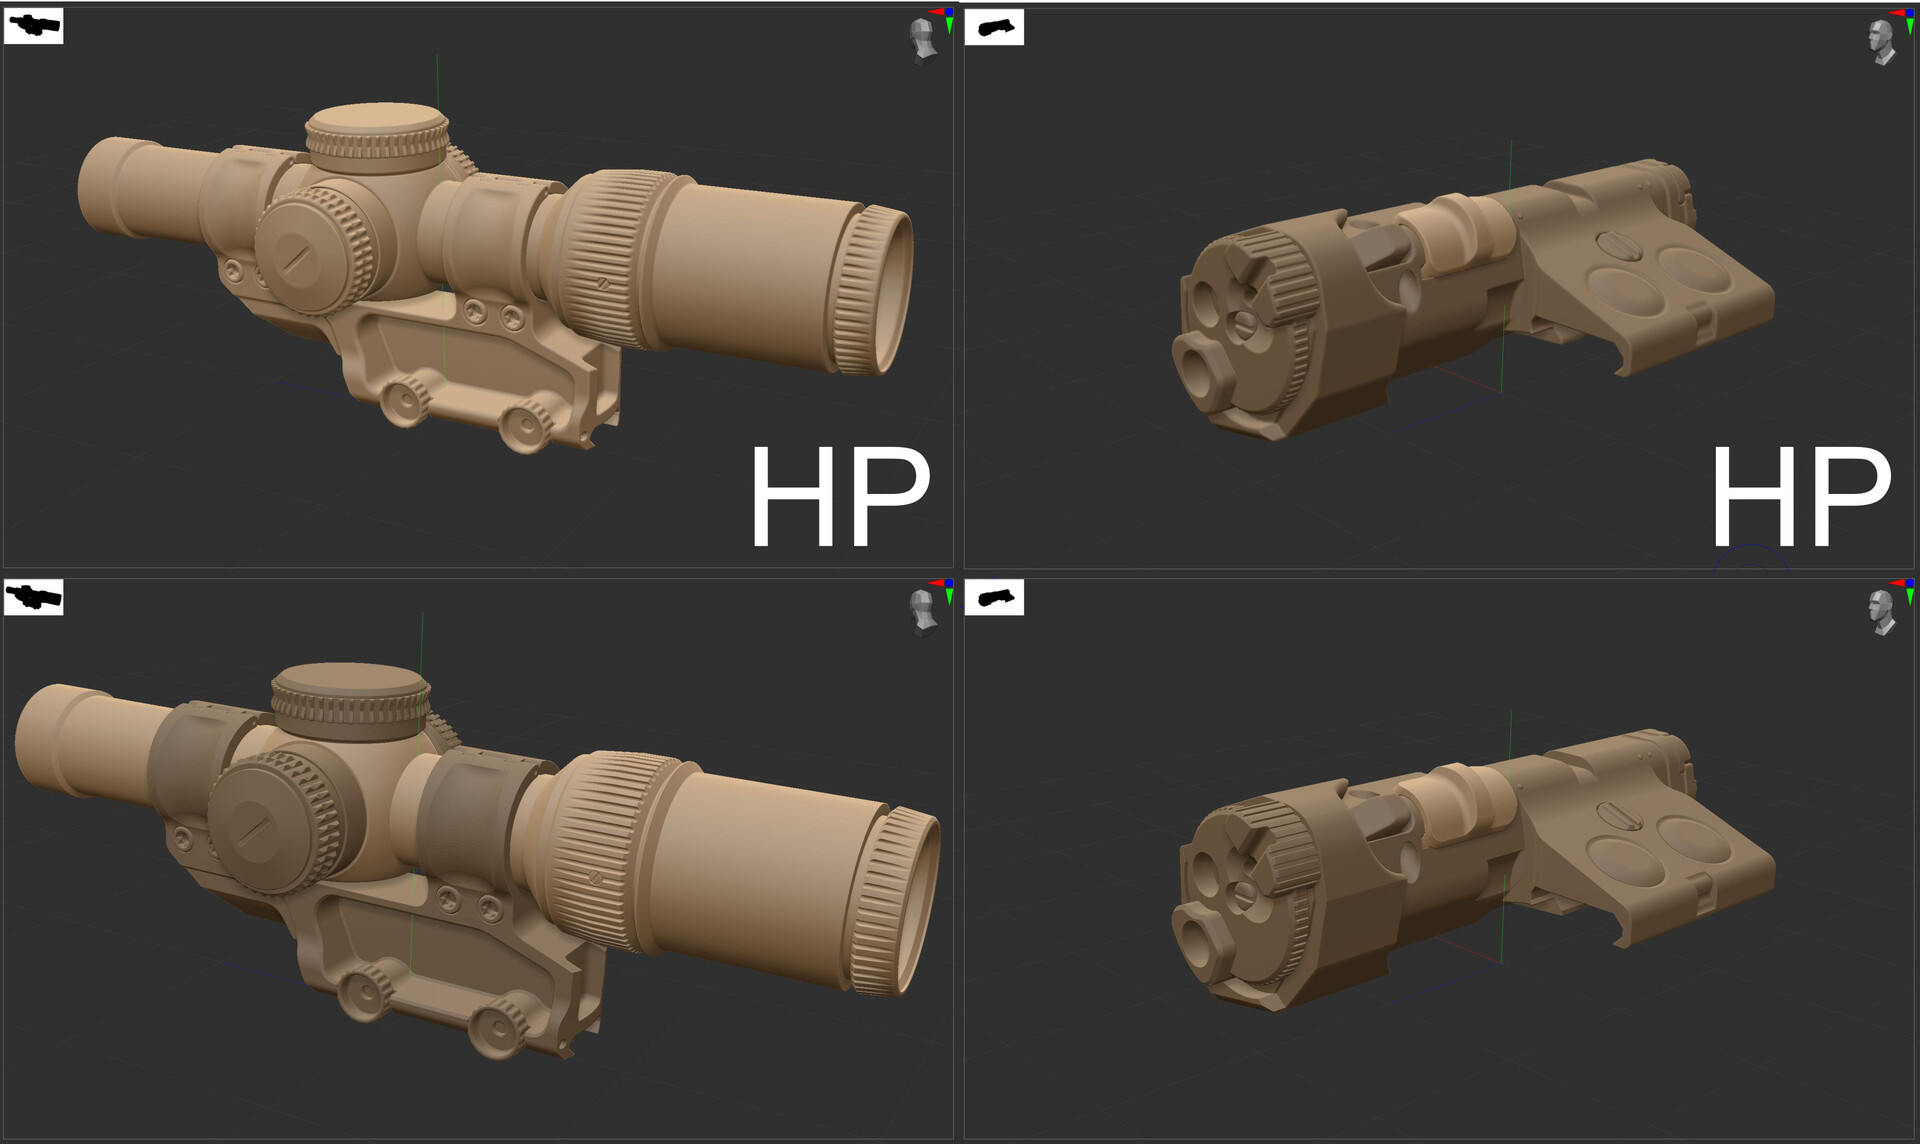
Fusion allows you to create a "perfect" mid poly model in a short amount of time. It's not really a "mid-poly" because when you export it from Fusion, your model is relatively low, but what I mean by "mid-poly" is this version between your high and your low. It's not high enough to be a High Poly, and it's not clean enough for being a Low Poly.

These are the times it took me for each asset (Fusion, Zbrush, Blender):

  • Aimpoint T2 + Support: 6 hours
  • Vortex Scope + Support: 8 hours
  • MAWL-DA Laser: 9 hours

II. Moi3D - Adding topology

Using Moi3D in this workflow is quite a "grey" area for me. I don't really like to have one more software in my pipeline that I basically use only a couple of minutes, but I don't know how I would work without him now. I'm still looking for other possibilities. I need to give a try to the Zbrush's Remesher, for example.

My usage of Moi3D is pretty short and straightforward. When I'm done with my Fusion model, I export it in STEP format. Then I import it in Moi3D, and you will see that the mesh is pretty low poly (even too low), and you don't have a good enough topology to work within Zbrush.

Moi3D just allows me to add a lot more geo for my ZBrush base mesh and a bit more for the low poly that I will clean in Blender after. So, basically, I'm just importing my STEP mesh in Moi3D and directly exporting it in OBJ or FBX with those export settings:

Take those values as a "base." Sometimes you will need to change the values based on your objects. But it gives you an excellent base to work with 90% of the time.

When these are exported, we can move on to the high poly.

III. Zbrush - High Poly Creation

Now that I have an excellent base to work within Zbrush let's jump into it!

The ZBrush part is relatively short and straightforward too. Thanks to Fusion and Moi, all we need to do is Dynamesh and smooth the edges. Now, sometimes you will need to subdivide a bit, especially some rounded parts.

Nothing scary here. Just add a crease set with a value between 20 & 35. If it missed some edges, you can use the Z modeler brush, choose "crease," and select the edges manually.

For the smooth edges, I only use Polish, Polish Crisp Edges, and Polish by Feature until I get a result I'm happy with.

When I'm happy with the high poly, I just do a decimation master pass on every subtools and then do an "export all" using GOZ/GOB (I'm using the free plugin GOB to import Zbrush GOZ meshes into Blender*).

Small info about this, I saw a performance issue using it. The models exported/imported using GOZ/GOB take some minutes to export from Blender and are imported in Toolbag 4 for the bakes. I'm not sure why and I need to make some tests with a "classic" ZBrush export to see if I'm facing the same problem.

IV. Blender - Low Poly & Unwrapping

Now that my "low poly" mesh is exported from Moi3D, I can import it into Blender for some cleaning and Unwrapping (favorite part !!!). The cleaning part can take time because the mesh isn't 100% clean when exported from Moi3D. But even if you put two or three hours to clean your mesh, this is still a lot faster than the classic modeling workflow at the end of the day.

The cleaning part is pretty simple, just merge the vertices that are alone, connect them to avoid Ngons, delete the faces we will not see, reduce the edges of the rounded areas, etc.… classic low poly stuff here.

My meshes could be lower in polygons and a bit cleaner in some areas, but I decided to keep a "high" low poly count for these tests, and aye, it's 2021. We can have suitable poly counts now :D.

For the Unwrapping, thanks to the hard edges we kept in Fusion and Moi3D, who automatically marked the edges as "sharp," I just need to select them and do a "similar select (SHIFT + G) -> normals" to choose the other sharp edges and marking these into seams.

Then, I add all the other seams I need (like cutting cylinders, etc.), and then I make my first unwrap. After some fixing here and there on the islands and making the cylinders straight, I'm doing a pack with UVPackmaster. After some iterations and some custom padding values, it's ready for the bake.

For the Unwrapping, thanks to the hard edges we kept in Fusion and Moi3D, who automatically marked the edges as "sharp," I just need to select them and do a "similar select (SHIFT + G) -> normals" to choose the other sharp edges and marking these into seams.

Then, I add all the other seams I need (like cutting cylinders, etc.), and then I make my first unwrap. After some fixing here and there on the islands and making the cylinders straight, I'm doing a pack with UVPackmaster. After some iterations and some custom padding values, it's ready for the bake.

As you can see, I let the Aimpoint's UVs on purpose here. This is the first mesh I tested in this workflow, and I messed up the export settings in Moi3D. It resulted in the cylinders that weren't "good/perfect," so it wasn't possible to straighten them. Do not hesitate to put a bit more geo when you export from Moi3D. 

I did my bakes into Marmoset Toolbag 4. I decided to not cover this process. There's plenty of articles and videos online that cover the subject. I did nothing crazy for the bakes. Toolbag is such perfect software. I just dropped my meshes and baked them.

V. Conclusion

My conclusions on Fusion 360 paired with Zbrush: This is awesome!

More seriously, in a way, I regret not having learned it sooner, but, in another way, I wasn't ready for it, and thanks to my subdiv experience, I got that problem-solving experience that kicks in if needed. I recommend this software, paired or not with Zbrush, to any weapons/hard surface artist.

It's easy to learn (it took a couple of hours for me), it's simple to use, you're working in a non-destructive workflow, you still have the control on all the edges, you don't have to bother about topology at all, and this is super fun to use.

Thank you for reading this article! I recommend you to take a look at the previous article I wrote, The Howel Ganuchaud Guide for Modern Gun Texturing.

This article is from SEP 30, 2021 and was written for Game Art Blog. I'm posting it here because the Game Art Blog was shutdown.
A lot of things like Tools, values and more have changed in my workflow since this article, I'm gonna do an updated article in the next months.

Report

Blender DECALmachine - Create decals from alphas

Tutorial / 24 December 2019

Requirement : 

- Basic DECALMachine knowledge

- Watch this decal creation video

DM is a powerful tool, I love using it and it saves me a bunch of time. After a couple weeks of using it, I needed some custom decals and I don't want to put a lot of time into decals modeling. I have a lot of alphas I use in substance painter, I gave some first test into blender, but it wasn't looking great but with some patience I found a way. It requires a bit of manipulation and time, but it's an evil for a good.

Decals creation 

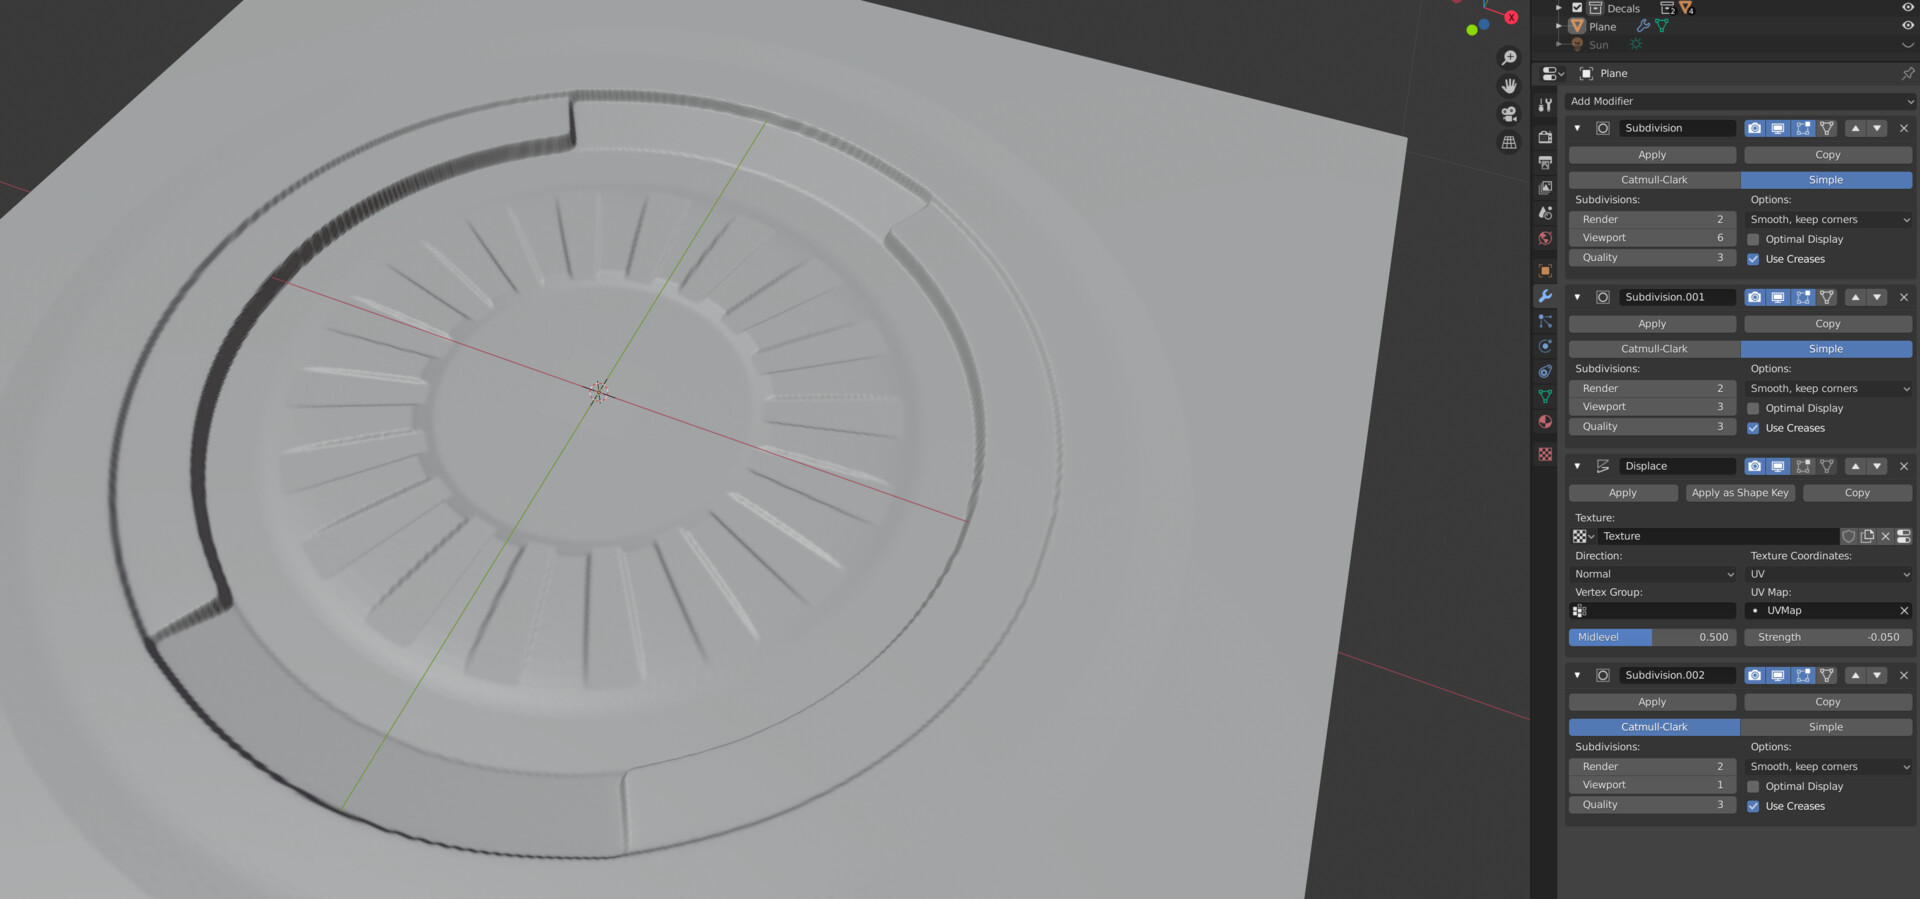
Start with a basic plane and add some subdiv modifiers, then add a Displace with "Texture Coordinates" on UV and "UV Map" on the uv map of your plane. For the Displace values, I'm moving between -0.50 -> 0.050, for me those values are enough, if you're too low you will not see the normal effect and if you're too high you will have polygons artifacts.

Just like this :

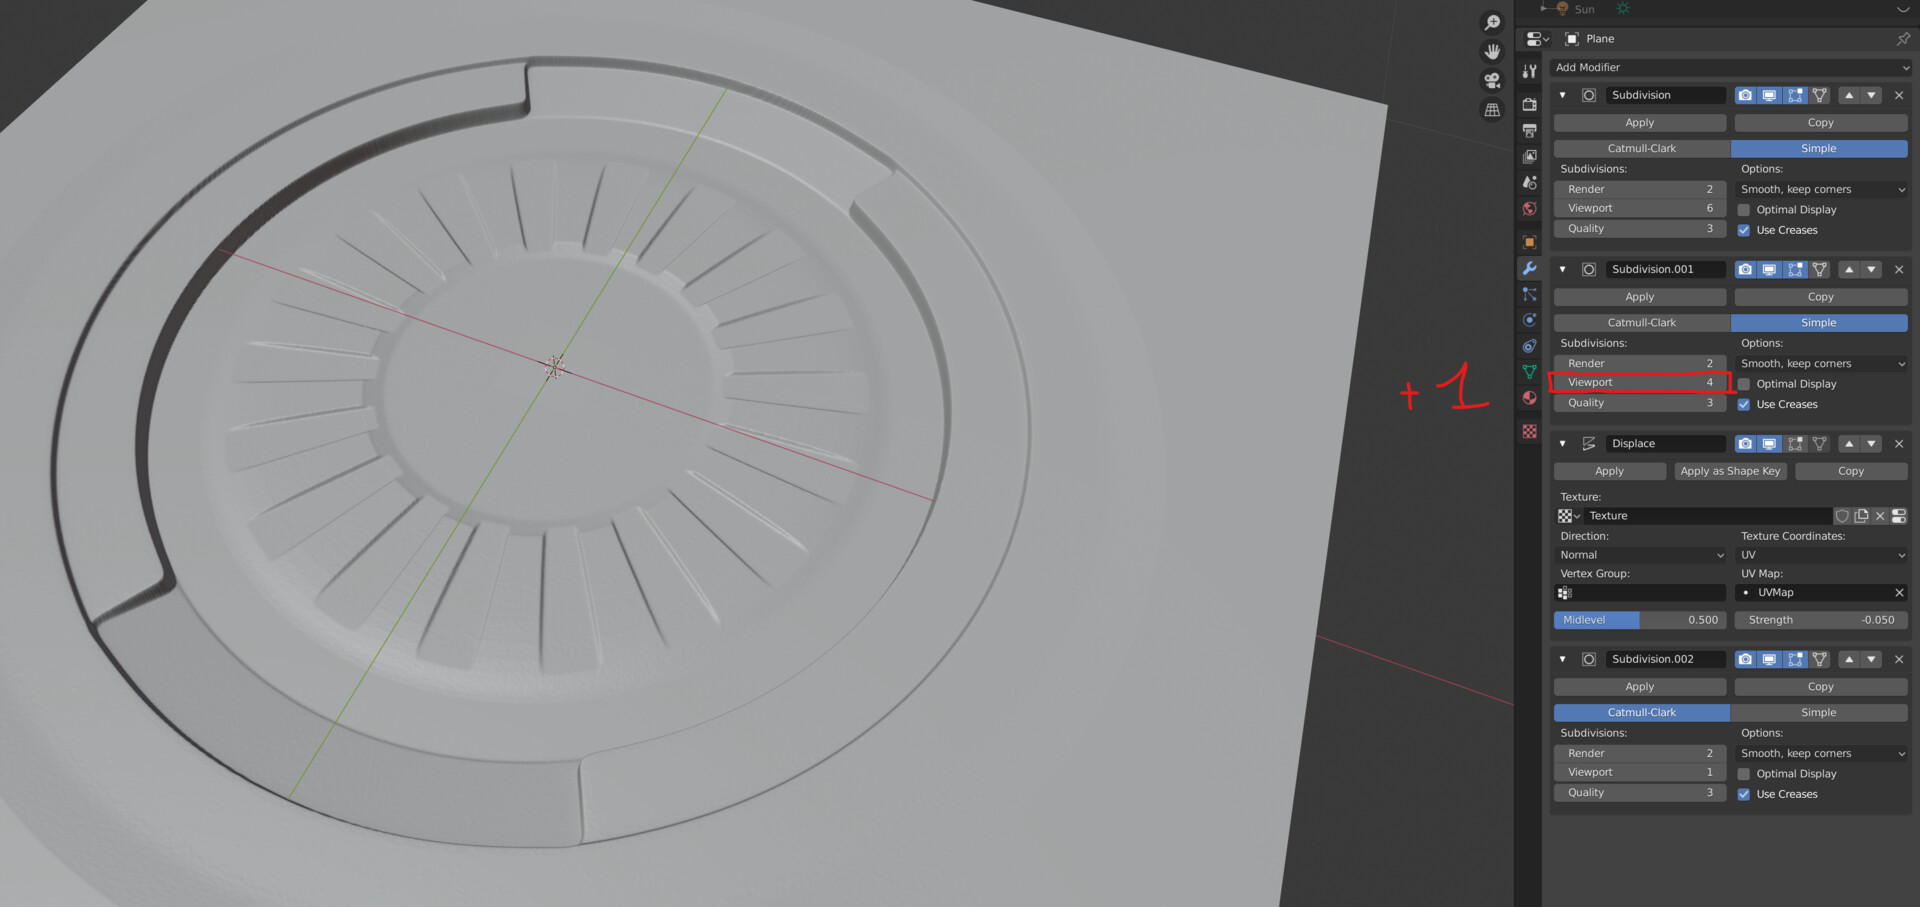
Note: The second Subdiv modifier is using the level "3", level 3 is your main base for almost every non-cylinder alphas. For cylinder alphas you need to add one more level (go to level 4) because if not you will not have enough geo on your plane and will have some low res artifacts. like here : 


Note : The low geo artifact are still a bit present, but it's okay for the bake.

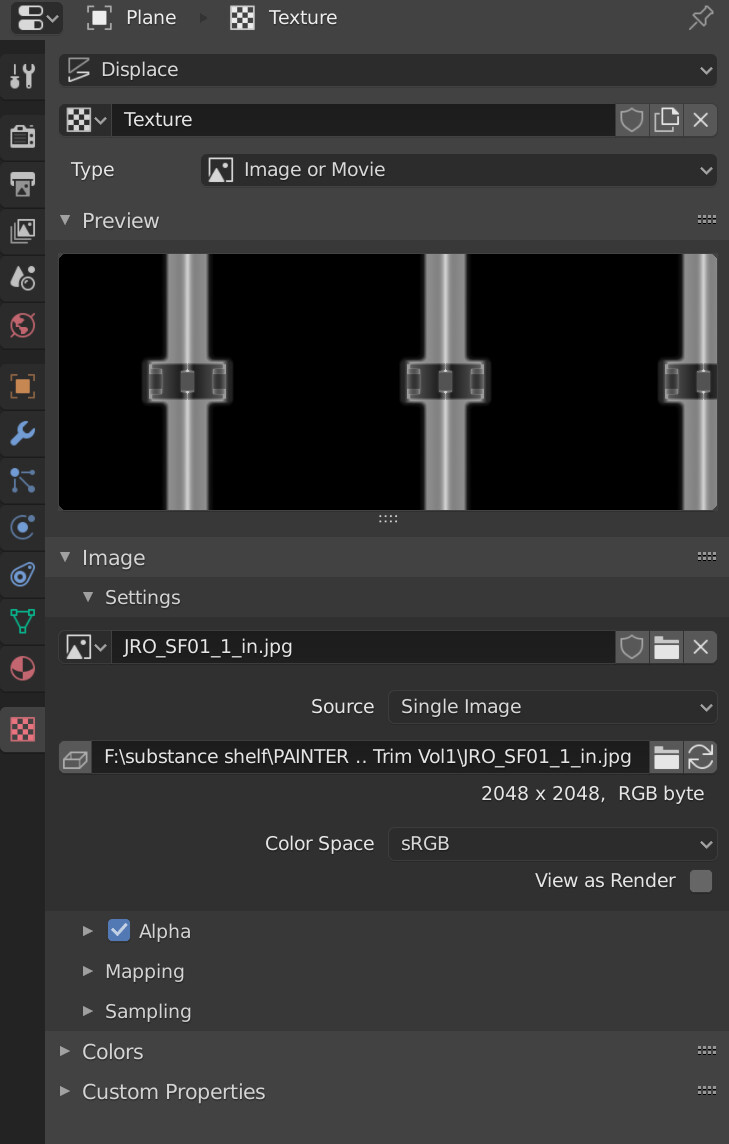
After your plane is correctly subdivided, just go to the texture panel (last one) and take your alpha : 

After that, just choose the right displace value, play with it and you will get something like that :


 When you're happy with your mesh and everything is looking great, just open the DecalCreation Tab. Nothing crazing here if you know already how to create decals. The only point to keep in mind, the plane is subdiv a lot, it takes a bit of time to bake the decal (couple minutes) try to not go too crazy about the AA and the AO resolution. Baking in 256/512 is really enough for decals.


Note: I have reduced the Curvature Wid just for a test on the bake time, default is 1.

When the baking is done, you need to open substance designer (I use Designer to combine the original alpha into the normal alpha channel).

Why I'm doing this ? Simple, as you can see with your decals, DM baked the background, depending on the situation it can be annoying.

In designer, the setup is really easy, just import the alpha, add an "histogram scan" with almost 1 of value, add a small "blur hq grayscale" (I'm using a value of 2) and connect it to the grayscale input of the "alpha merge" node : 


Note: the only change for the panel version is the transform 2D I use after the alpha bitmap

Next step is to save the new normalmap over the baked one, but not the one you imported. When DM baked the decal, he already merge the alpha and the normal, but for him, there's no alpha to bake because we didn't remove the plane background (too hard with the subdiv plane, I tried using an alpha mask directly in blender but DM don't detect it).

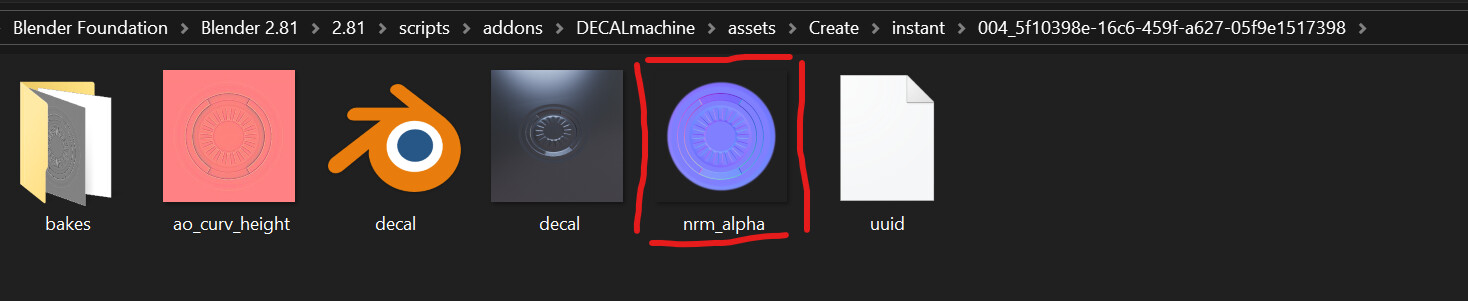
The file you need to replace is in this repository : "DECALmachine\assets\Create\instant\YOURBAKEDDECALNAME" and the file is the "nrm_alpha.png".
  

For basic decals you're done. You need to add the decals again into blender to see the modification or a quick restart. If you"re happy with it, just "add to my library" and it's done.

For panels, you need an extra work in photoshop, a small crop on the "nrm_alpha.png" and "ao_curv_height.png" (apply the same value on each) :


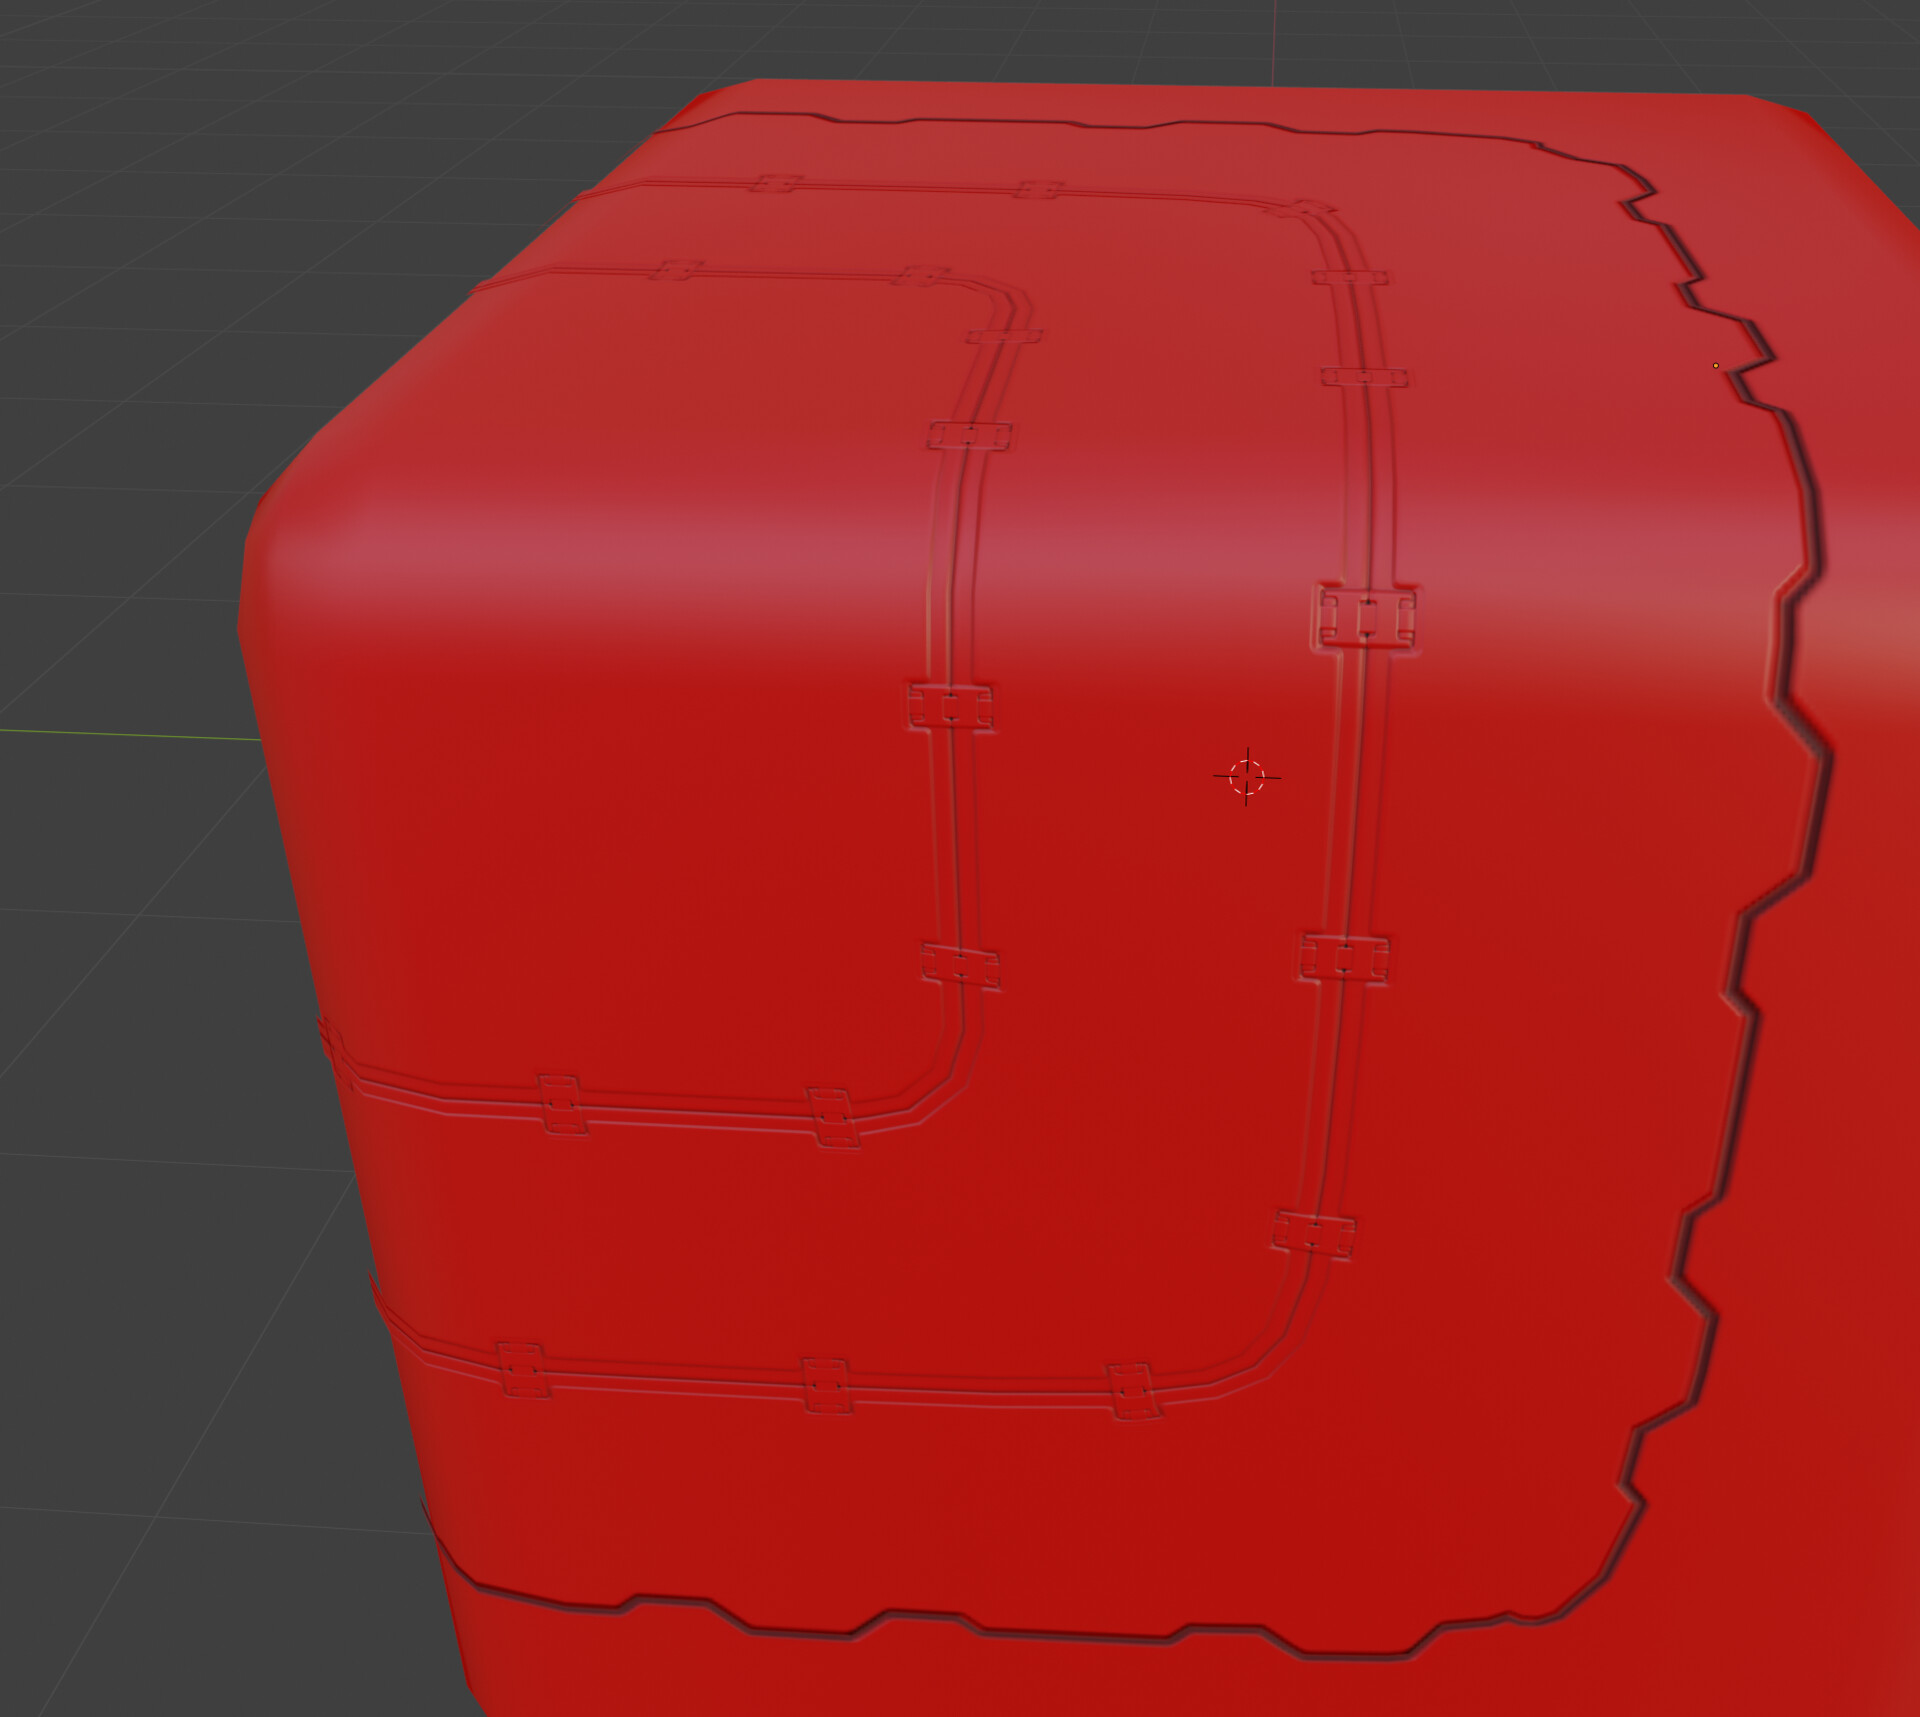
Final look : 

Panels :

Note: I need to run more tests about the panels because there's some problems with the color attribution, for me, it's not a big deal because I'm using decals only for the normal side but it can be a bit annoying for some peoples.

I hope everything is clear enought, ask me anything if needed !

Report